
Comparing to the original touchscreen by Raspberry, this is a cheaper alternative but would require some technical knowledge and troubleshooting to get it to work
After purchasing some cheap touch screen off Aliexpress for my RPI 4, I realize that there were no proper instructions on how to install and troubleshoot the product itself.
First off, it came with a 3-part housing, a 3.5" Touch Screen which part number corresponds to “XPT2046”, a few heat sinks, and a sponge-like thing. Firstly Screw the 4 screws onto the base plate and install the heatsinks on the RAM, CPU and the usb controller. Then install the touch screen with the pins flushed all the way to the corner.


Now, I would recommend starting a fresh copy of Raspberry Pi OS using balenaEtcher with the original Raspberry Pi iso. For some reason when I used the out of the box installer / NOOBS provided by Raspberry, my HDMI output does not work.
Once it’s done, there’s a couple of options, either to install it offline, or online. I would definitely recommend the online installation of the driver, for the offline installation instructions, it’s about the same and can be referenced here. For the online installation, all you have to do is follow the instructions on the LCDwiki and git clone the repository into your root folder.
This article will cover the Physical Way of connecting the HDMI output, this can be done in SSH if you know how to do it.
Pre Installation (Physical Way):
Connect your Raspberry Pi into the HDMI output with the touchscreen mounted as shown as the picture above. The touch screen should be illuminated white when the power source is connected to the Raspberry Pi. Start the Pi up, connect to the internet and launch the terminal.
Online Installation:
sudo rm -rf LCD-show
git clone https://github.com/goodtft/LCD-show.git
chmod -R 755 LCD-show
cd LCD-show/
A side explanation of what the code is doing is basically
1) Removing any instances of previous downloads, if you do not have anything there, it will not affect anything.
2) Downloading the LCD-show driver off the github repo into your Raspberry Pi root folder.
3) Changing the permission to “755” which allow everyone to read and execute the file, the owner is allowed to write to the file as well
4) Change the directory pointer to the LCD-show folder
Now here’s the thing, the downside of this cheap touchscreen has cons whereby it can only run a single instance of display. i.e It can only run either the touchscreen OR your HDMI output.
Run this particular line ONLY when you want to move your “screen” output onto the touchscreen. (ensure that your current terminal directory still points to LCD-show/)
sudo ./LCD35-showThis will do change the output display onto the touch screen, your HDMI output will be rendered useless UNTIL you run the code that change the touch screen output back into the HDMI output. Now after running that line of code, your Pi should restart and the display will be shown on the touch screen instead. To change the display back into HDMI, you will have to again open up the terminal, change the directory and run the HDMI output code which as follows:
cd LCD-show/
sudo ./LCD-hdmi
Now here comes the problem, as of 21–7–2020, the LCD-show driver for some reason has issues with the XPT2046 whereby the touch is inverted i.e touching the start menu (top left), it will “touch” the bottom right of the screen. The x-y axis are inverted. Now the only current solution that I have explored and tested is that you will have to run these codes on the terminal: (Internet required)
cd LCD-show/
sudo dpkg -i -B xinput-calibrator_0.7.5-1_armhf.deb
DISPLAY=:0.0 xinput_calibrator
Once the following code has run, there will be a touch calibrator window that pops up and asking you to use your stylus to point into it. Follow the steps and then run the following lines on the terminal:
sudo nano /etc/X11/xorg.conf.d/99-calibration.confNow the window will look like this:
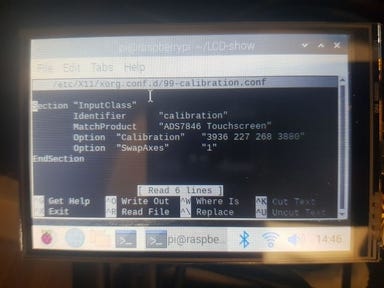
Change the “SwapAxes” “1” into “SwapAxes” “0" by using your keyboard / onscreen keyboard directional keys to navigate.
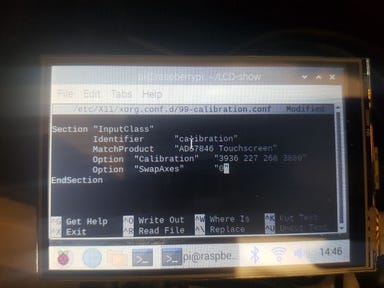
Save by pressing control + x, followed by “Y” and enter.
You must repeat the edit of the configuration file (from 1 to 0) EVERYTIME you switch to the touchscreen from the HDMI. Hopefully the developers will fix this particular issue.
Once saved run the command
sudo rebootAnd everything should work. And again a reminder, if you want to switch back to the HDMI output, you will have to change directory to the folder and run the sudo ./LCD-HDMI line vice versa for the touch screen.
Now, this might sounds troublesome as how do you remember the commands?
I have then simplify it further by writing executable scripts onto my Rpi desktop to either to launch in HDMI mode, touchscreen mode or ROTATE the screen. I.e Instead of typing out the commands, I can just one-click the script and automate the process.
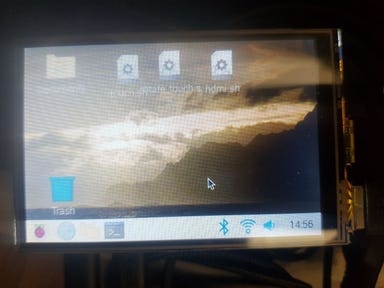
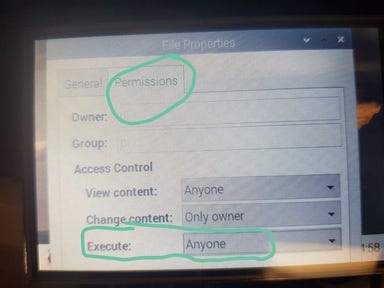
Note that all these executable files have to be on your Rpi Desktop. I will just give an example for afile, and the rest will just be the same. Firstly right click on the RPI desktop and create a new file. I call it touch.sh , following that right click the touch.sh file and go to properties, change the execute from nobody to Anyone. Click ok and again, right click the touch.sh file and click Text Editor. Type in the following command:

cd ../LCD-show/
sudo ./LCD35-show
Click save and exit the text editor. Launch the terminal, change directory to the desktop and change the permissions:
cd Desktop/
sudo chmod +x touch.sh
With that you are done. All you have to do is just click the touch.sh file and click execute in terminal.
I have also created a touch.sh (launch in touch screen mode) , hdmi.sh (launch in HDMI mode) and rotate.sh which rotates the touchscreen display (180 degrees). The steps are the same as above, just change the file name and file permissions.
hdmi.sh:
cd ../LCD-show/
sudo ./LCD-hdmirotate.sh:
cd ../LCD-show/
sudo ./rotate.sh 180
As you can see the downsides are you will have to boot into either one of the displays to choose which other display you will want it to, I suppose that’s the con of having a cheap display. P.s I tried watch Youtube on the 3.5" display and boy it is so bad. The only use for this touch screen 3.5" display I guess its more for static display / no intensive graphics at all.
That’s all for me, if there’s any questions do feel free to drop any in the comments or even better share with me if there’s anyway to multi display the output on the HDMI and the touch screen simultaneously.
Sources:
https://github.com/goodtft/LCD-show
http://www.lcdwiki.com/3.5inch_RPi_Display